
Losing a tooth before an implant doesn't mean you have to hide your smile or struggle with eating. You can wear effective temporary teeth—removable or fixed—that keep up your appearance and function while your implant heals. The right option really depends on esthetics, bite strength, and whether you need extra procedures like bone grafting.
Let's dig into why an interim solution matters, the most common temporary restorations out there, how to pick the best one for your situation, and some real-world tips to protect your implant while it heals. You'll get a sense of what to expect so you can make a practical, confident decision and keep life on track as your implant integrates—and if you're looking for guidance every step of the way, a trusted dentist in Minot can help you navigate it all.
Why Interim Tooth Solutions Are Necessary
Temporary teeth let you keep your smile presentable, protect the surgical area, and help you speak and chew with as little disruption as possible while the implant heals.
Maintaining Appearance and Confidence
Losing a visible tooth can totally change how you present yourself at work or in social situations.
A flipper, temporary bridge, or immediate denture fills the gap so you can show up to meetings, interviews, or parties without covering your mouth or feeling awkward.
Restored appearance can really reduce self-consciousness and help prevent changes in facial support that sometimes come with missing front teeth.
Matching the shade and shape to nearby teeth matters—definitely ask your dentist about shade selection and maybe even a trial fit before you lock in the temporary.
Temporary restorations come removable or fixed.
Removable options make cleaning easier, while fixed temporaries usually feel more natural.
Talk through cosmetics, comfort, and cost with your dentist to figure out what fits best for you.
Protecting the Implant Site
A temporary restoration shields the extraction and implant area from direct bumps and food debris.
That protection lowers the risk of accidentally disturbing the healing clot or putting early pressure on the implant, which could mess with osseointegration.
Your temporary also helps spread out bite forces away from the implant while it settles in.
Dentists often design temporaries with less bite contact on the implant side to keep pressure down.
Follow care instructions—avoid hard or sticky foods and clean gently—to keep that protection in place.
Temporary devices can help keep the soft-tissue shape around the implant, too.
Preserving the gum and papillae contours improves the final look and makes fitting the permanent crown or bridge more predictable.
Facilitating Normal Speech and Eating
Missing teeth change how your tongue hits your teeth and how air flows when you talk.
A temporary tooth brings back those contact points and helps you speak clearly again, which is especially important if you talk a lot for work.
Temporaries let you chew most soft or moderately firm foods, so you can keep up your nutrition during healing.
Dentists usually suggest cutting food into smaller pieces and avoiding biting directly with the implant-side tooth until everything’s fully healed.
If you notice changes in speech or trouble eating, your dentist can tweak the temporary’s shape, height, or fit.
Minor adjustments often fix lisps or pressure spots pretty quickly, so don’t be shy about mentioning any issues at follow-ups.
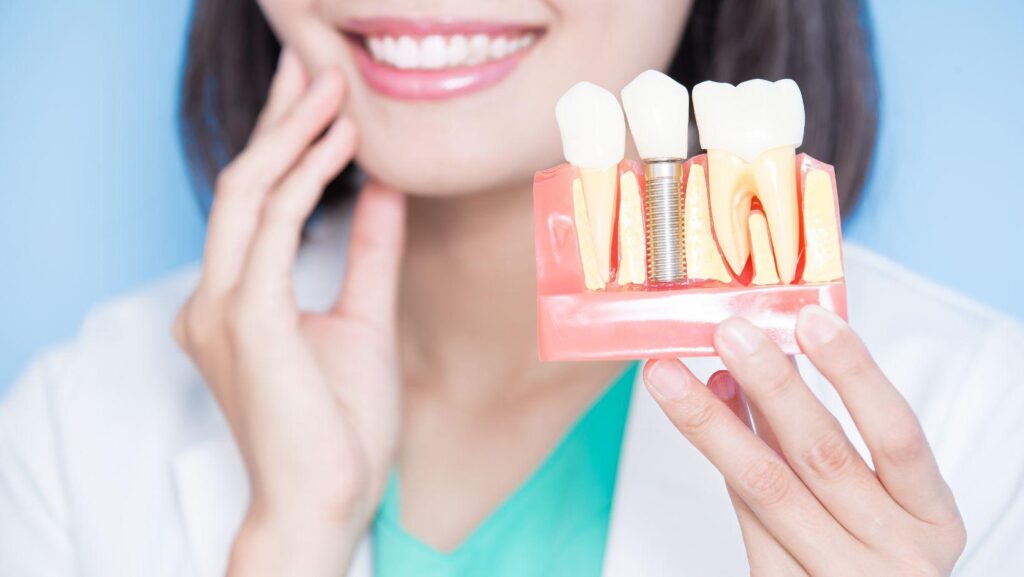
Types of Temporary Restorations
You’ve got a few choices—removable or fixed temporaries that protect the implant site, keep you looking good, and let you eat and speak.
Each one varies in how it stays in, cost, and how it affects nearby teeth and healing.
Removable Partial Dentures
Removable partial dentures (RPDs), or “flippers,” are acrylic prostheses that replace one or more missing teeth and clip onto adjacent teeth or soft tissue.
They're lightweight and affordable, so they're a common pick for short-term use while implants heal or when you need to replace several teeth temporarily.
The lab can usually make these pretty quickly—sometimes in just a few days to a week.
Take them out at night and clean them separately; avoid hard or sticky foods that could pop them loose.
RPDs put some pressure on gums and neighboring teeth, so your dentist will keep an eye out for irritation and adjust the fit as needed.
Essix Retainers
An Essix retainer is a clear, vacuum-formed tray that holds one or more false teeth within the shell.
It's almost invisible and keeps teeth in place without bonding to the ones next door.
Essix temporaries work well for front-tooth gaps and short-term use while the implant heals.
They're cheap and easy to replace if they wear out or crack, but don’t expect them to handle heavy chewing.
They can also trap food and moisture, so take them out and rinse after meals.
Expect your dentist to check the fit and trim any spots that press on healing tissue.
Temporary Bridges
Temporary bridges are fixed restorations that span a gap by using neighboring natural teeth (or implants) as supports.
They can be cemented or bonded and usually give you better chewing and stability than most removable options.
Your dentist will prep the supporting teeth as little as possible, or use adhesive techniques to avoid major changes.
Temporary bridges work well when implant placement is staged or if you want a more natural feel for a few months.
Keep up with oral hygiene under and around the bridge; your dentist might schedule extra cleanings or tweaks to prevent decay on the abutment teeth and keep your gums healthy.
Immediate Load Provisional Crowns
Immediate load provisional crowns attach to the implant or a temporary abutment right at implant placement, giving you a fixed tooth during healing.
This only works if the implant is really stable to start and your dentist manages the bite forces carefully.
This option keeps the soft-tissue shape and looks and feels closest to a final crown.
You’ll need to stick to soft foods and avoid biting with the provisional to protect the healing implant.
Regular follow-ups let your dentist check for movement or bite issues—if the implant isn’t stable enough, they might swap it for a non-loading temporary.
Key Factors When Choosing a Temporary Tooth Option
You want a temporary that fits well, looks natural, and fits your budget, all while protecting your implant.
Think about fit, appearance, and what you’re willing to spend short-term and out-of-pocket.
Comfort and Fit
Comfort and fit really decide if you can talk and eat normally during healing.
Ask your dentist for an impression or digital scan so the temporary matches your other teeth and gums; a bad fit can rub, loosen, or trap food.
Consider how it stays in place: clasps on a removable flipper might feel bulky but are easy to take out; a bonded provisional or bridge stays put but needs careful placement to avoid stressing the implant.
Check that you can clean around the implant area without messing with sutures or the temporary.
If you have a sensitive gag reflex, ask for less palatal coverage or a lighter, contoured design.
Aesthetic Considerations
Your temporary should blend in with your other teeth and gums so it doesn't stand out.
Request shade-matching in natural daylight and photos so the lab can really match translucency and surface texture, not just color.
Think about how much gum shows when you smile and whether the temporary supports the papillae.
Provisionals that mimic the emergence profile can help keep soft-tissue shape and reduce black triangles later.
If you’re missing a visible front tooth, go for a fixed provisional or a high-quality acrylic flipper with careful shading.
For back teeth, function usually matters more than perfect looks, so a simpler option might be fine.
Cost Implications
Costs swing a lot depending on the type, materials, and whether the lab or dentist builds it same-day.
Acrylic flippers are usually cheapest, while lab-made bridges or tooth-borne temporaries cost more.
Ask what’s considered “temporary-only” versus what might count toward your final implant crown.
Some offices credit provisional costs to the final restoration; others don’t.
Remember, follow-up visits for adjustments or repairs can add up.
A cheaper temporary that needs lots of fixes might end up costing more in time and money than a better-fitting, slightly pricier option.
Caring for Your Temporary Solution
Keep your temporary tooth clean, avoid pressure on the implant site, and listen to your dentist’s advice about diet and follow-ups to protect healing tissue and the provisional.
Oral Hygiene Recommendations
Brush gently twice a day with a soft-bristled brush and non-abrasive fluoride toothpaste.
Angle the brush to clean around the temporary crown, bridge, or flipper base without jabbing the surgical site.
Use your regular floss, water flosser, or interdental brushes around nearby teeth, but be extra careful right next to the implant—slide floss out instead of snapping it through.
Rinse with a prescribed antimicrobial mouthwash or warm salt water (about half a teaspoon in 8 oz water) after meals to cut down plaque and soothe tissue.
Don’t swish too hard for the first week; keep it gentle.
Go to all your post-op visits so your dentist can check your bite, soft-tissue healing, and how the temporary fits.
What to Avoid During Healing
Don't chew hard, sticky, or crunchy foods on the side of the implant for the first 6–12 weeks. Wait until your dentist gives you the green light.
Stay away from foods like nuts, hard candy, ice, bagels, and chewy caramels. They're just asking for trouble during this stage.
Skip tobacco and heavy alcohol while you're healing. These habits slow down bone integration and make infections more likely.
If you smoke, talk to your provider about quitting or at least taking a break. It's not easy, but it's worth considering.
Brush gently—don't go at the surgical site with heavy brushing or poke around with toothpicks or metal tools. That area needs some peace.
Try not to put too much pressure on the provisional. If you clench or grind your teeth, ask your dentist if you need a nightguard.
Hold off on nonessential dental work near the implant, like deep cleanings or whitening. Wait until your dentist says you've fully healed.